


Integrate Hashnode in NextJs Project
Learn how to integrate Hashnode in NextJS and add some spices with Bootswatch


Hi everyone 👋, I'm glad to share with you my experience on how I integrate Hashnode into my personal website. We will learn how to integrate Hashnode into the NexJS project by exposing data via Hashnode GraphQL API. Without further ado let's get started 😁.
Start blogging with Hashnode
Resources
github.com/pelayochristian/hashnode-nextjs
Hashnode GraphQL API
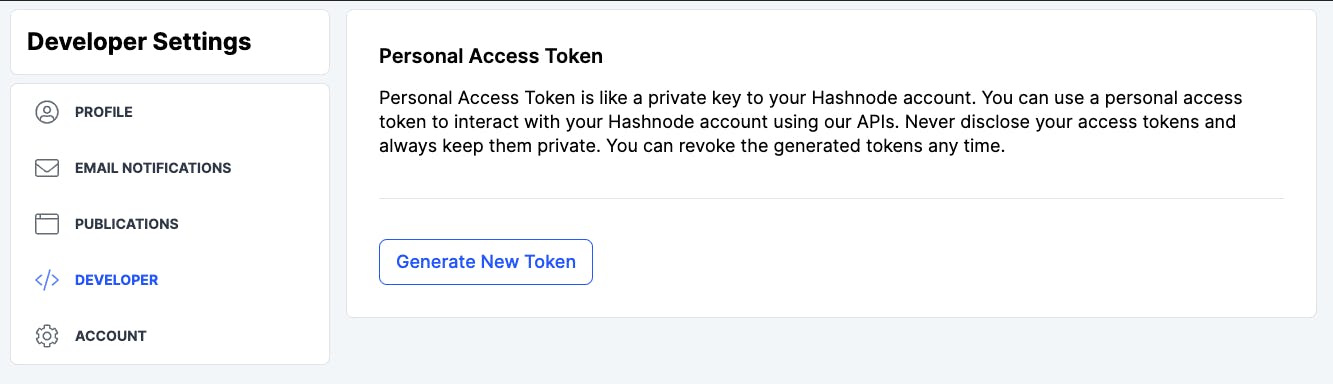
The first thing we need to do is to generate our Personal Access Token. Can be found on Account Settings > Developer. If you don't have it yet, just click Generate New Token.
Hashnode uses GraphQL to expose their data, not a typical REST integration. Don't be sad, they provide Playground where we can play around on how to do a GraphQL query as well documentation on it. Replace AUTHORIZATION_TOKEN with the Personal Access Token that we generate to authenticate 🔑. USER_NAME will be our Hashnode username.
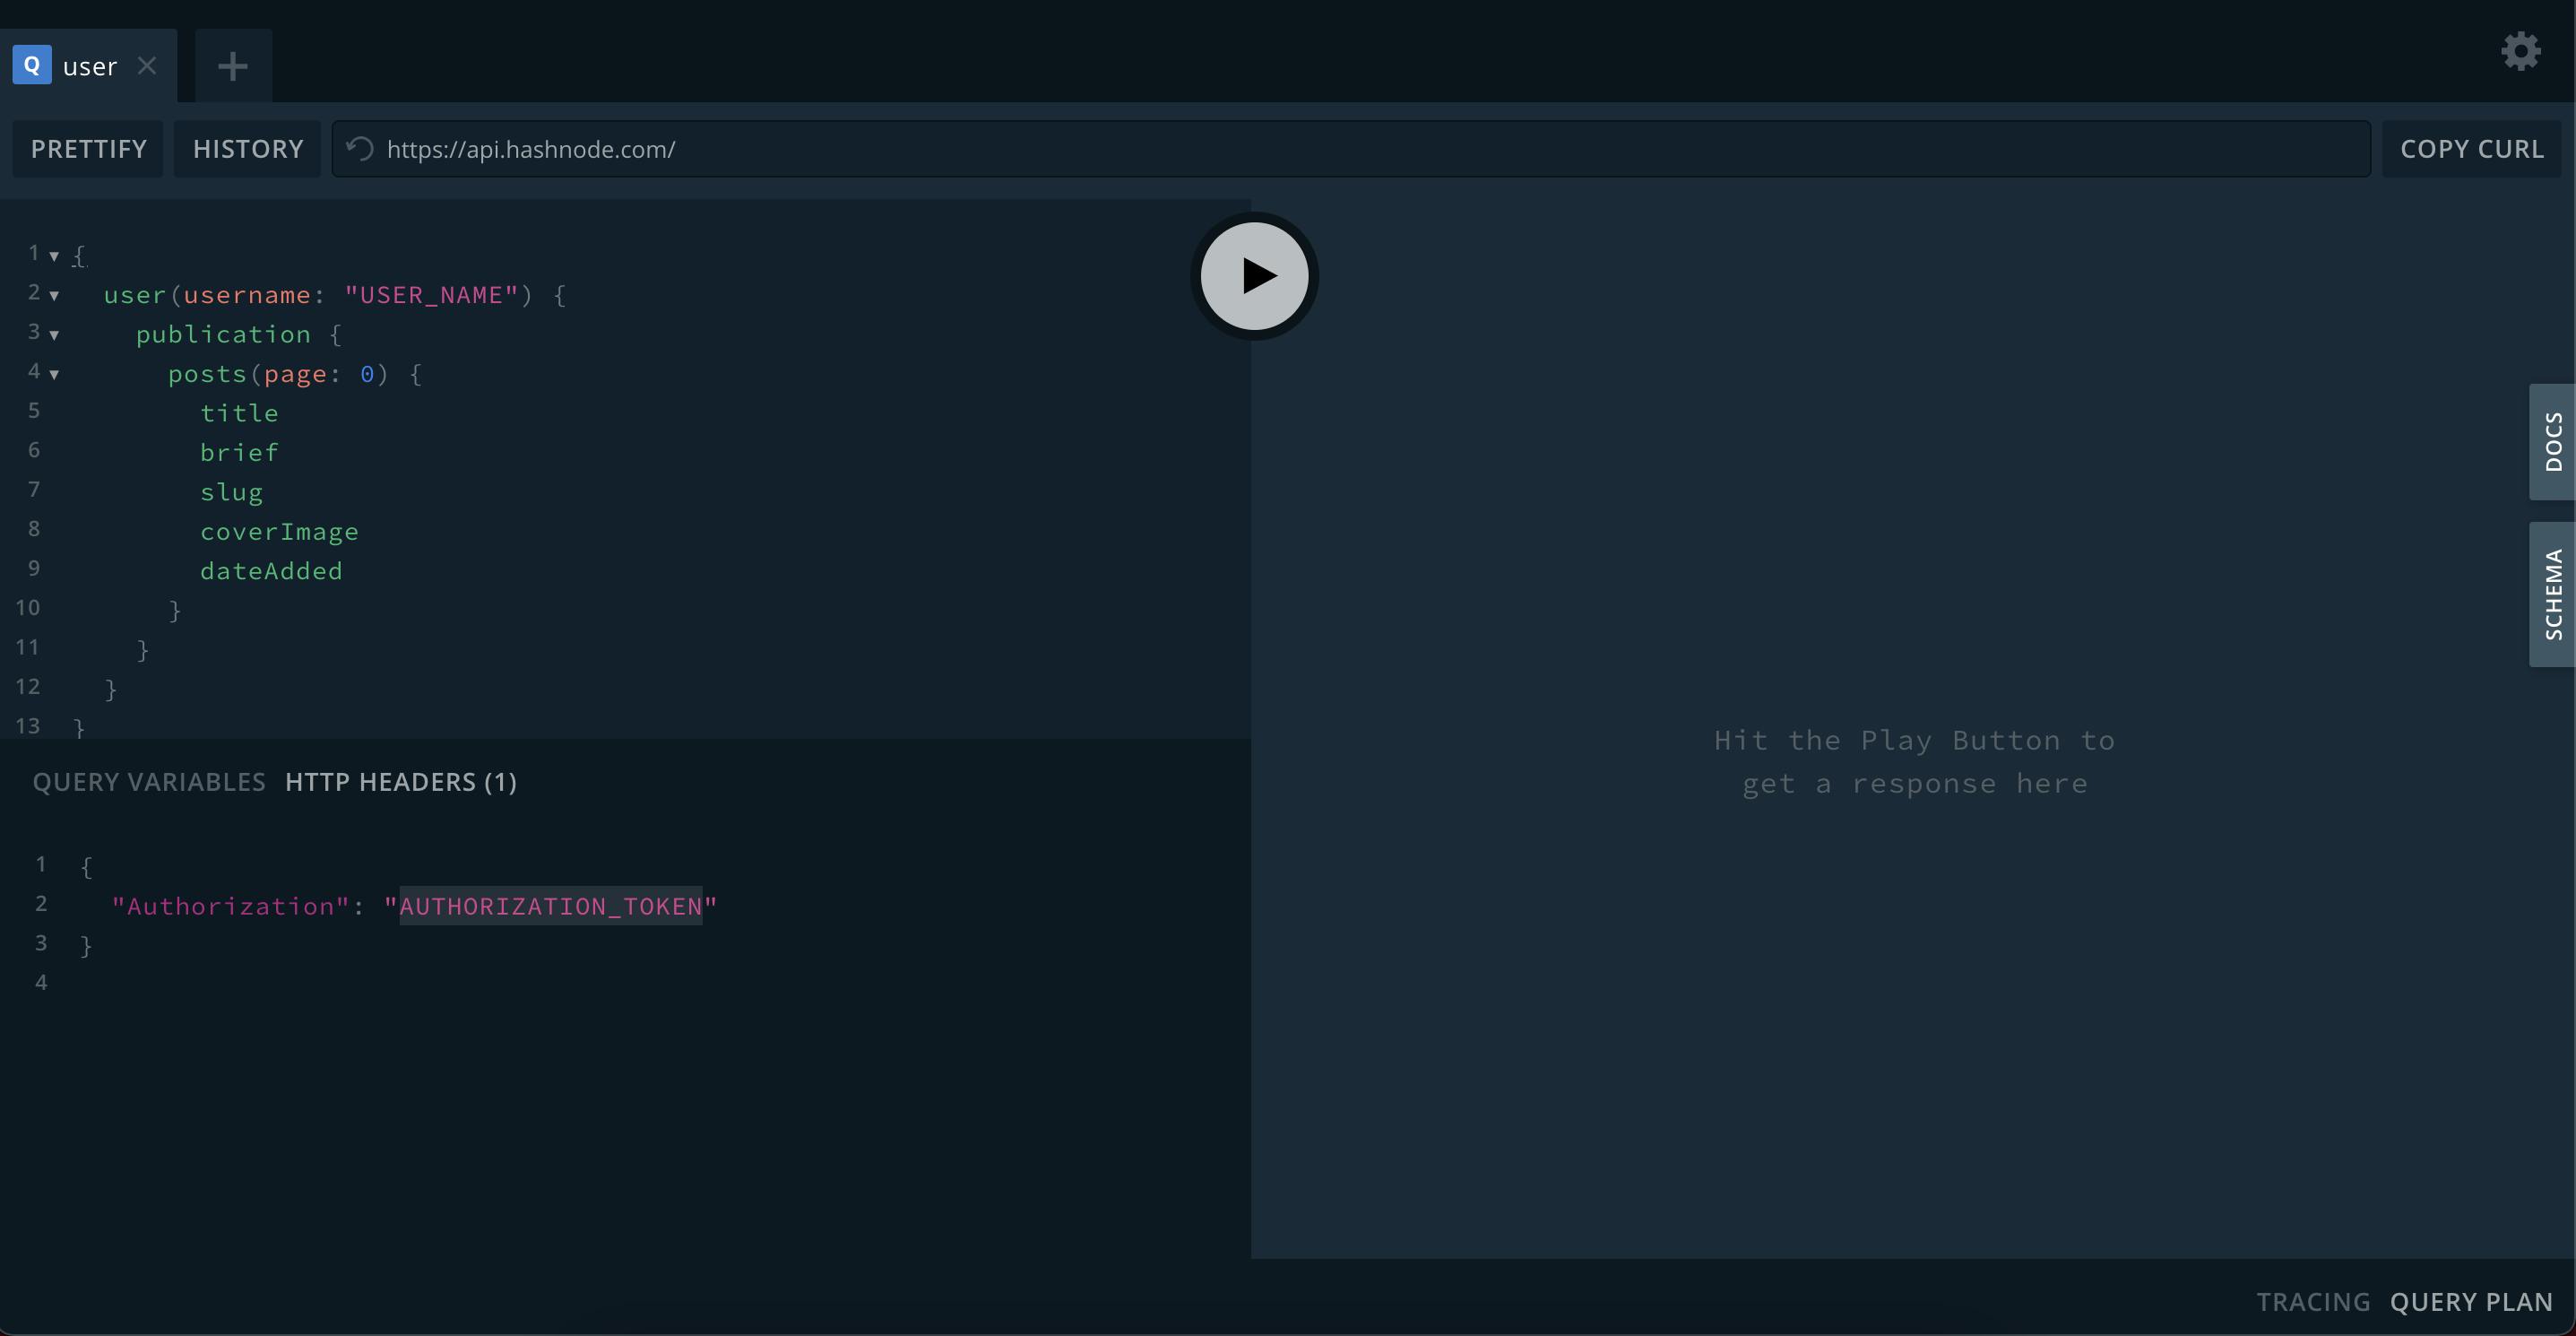
GraphQL Query:
{
  user(username: "USER_NAME") {
    publication {
      posts(page: 0) {
        title
        brief
        slug
        coverImage
        dateAdded
      }
    }
  }
}
Sample response based on the query above:
{
  "data": {
    "user": {
      "publication": {
        "posts": [
          {
            "title": "Sample Publication Three",
            "brief": "Sed ut perspiciatis unde omnis iste natus error sit voluptatem accusantium doloremque laudantium, totam rem aperiam, eaque ipsa quae ab illo inventore veritatis et quasi architecto beatae vitae dicta sunt explicabo. Nemo enim ipsam voluptatem quia vo...",
            "slug": "sample-publication-three",
            "coverImage": "https://cdn.hashnode.com/res/hashnode/image/upload/v1629290965251/QvkUKrYv0.png",
            "dateAdded": "2021-08-18T12:49:47.341Z"
          },
          {
            "title": "Sample Publication Two",
            "brief": "Sed ut perspiciatis unde omnis iste natus error sit voluptatem accusantium doloremque laudantium, totam rem aperiam, eaque ipsa quae ab illo inventore veritatis et quasi architecto beatae vitae dicta sunt explicabo. Nemo enim ipsam voluptatem quia vo...",
            "slug": "sample-publication-two",
            "coverImage": "https://cdn.hashnode.com/res/hashnode/image/upload/v1629290889668/1gVCuatKw.png",
            "dateAdded": "2021-08-18T12:48:28.438Z"
          },
          {
            "title": "Sample Publication One",
            "brief": "Sed ut perspiciatis unde omnis iste natus error sit voluptatem accusantium doloremque laudantium, totam rem aperiam, eaque ipsa quae ab illo inventore veritatis et quasi architecto beatae vitae dicta sunt explicabo. Nemo enim ipsam voluptatem quia vo...",
            "slug": "sample-publication-one",
            "coverImage": "https://cdn.hashnode.com/res/hashnode/image/upload/v1629290670844/KjX29Lz-L.png",
            "dateAdded": "2021-08-18T12:46:16.830Z"
          }
        ]
      }
    }
  }
}
Create NextJs Project
Make sure that your machine already has installed node.js
npx create-next-app
# or
yarn create next-app
Run the development server
Open http://localhost:3000 with your browser to see the result.
npm run dev
File structure for our page and component directory.
.
├── ...
├── components          # Components Folder
│   ├── BlogItem.js     # Single Blog component
│   ├── BlogList.js     # Wrapper component for our  BlogItem
│   ├── Header.js
│   └── Layout.js       # Blueprint for our page Layout
├── pages               # Pages Folder
│  ├── _app.js
│  └── index.js
└── ...
Let's beautify our project by installing Bootswatch.
npm install bootswatch
Pages
app.js
import "../styles/globals.css";
import "bootswatch/dist/pulse/bootstrap.min.css";

function MyApp({ Component, pageProps }) {
  return <Component {...pageProps} />;
}

export default MyApp;
index.js
import Layout from "../components/Layout";
import BlogList from "../components/BlogList";

export default function Home({ publications }) {
  return (
    <Layout>
      <BlogList publications={publications} />
    </Layout>
  );
}

/**
 * Method used to fetch data from Hashnode.
 * @param {Object} context
 * @returns props
 */
export async function getServerSideProps(context) {
  const res = await fetch("https://api.hashnode.com/", {
    method: "POST",
    headers: {
      "Content-Type": "application/json",
      Authorization: "0a5eee0d-d0d1-443e-840c-e57fed1ec879",
    },
    body: JSON.stringify({
      query:
        'query {user(username: "testchan") {publication {posts(page: 0) {title brief slug coverImage dateAdded}}}}',
    }),
  });
  const publications = await res.json();

  if (!publications) {
    return {
      notFound: true,
    };
  }

  return {
    props: {
      publications,
    },
  };
}
Header.js
export default function Header() {
  return (
    <nav className="navbar navbar-expand-lg navbar-dark bg-primary">
      <div className="container">
        <a className="navbar-brand" href="#">
          Hanshnode & NextJS
        </a>
        <button
          className="navbar-toggler"
          type="button"
          data-bs-toggle="collapse"
          data-bs-target="#navbarColor01"
          aria-controls="navbarColor01"
          aria-expanded="false"
          aria-label="Toggle navigation">
          <span className="navbar-toggler-icon"></span>
        </button>

        <div className="collapse navbar-collapse" id="navbarColor01">
          <ul className="navbar-nav me-auto">
            <li className="nav-item">
              <a className="nav-link active" href="#">
                Home
                <span className="visually-hidden">(current)</span>
              </a>
            </li>
          </ul>
        </div>
      </div>
    </nav>
  );
}
BlogList.js
import BlogItem from "./BlogItem";

export default function BlogList({ publications }) {
  let posts = publications.data.user.publication.posts;

  return (
    <div className="mt-5">
      <div className="mb-4">
        <h2>My Publications</h2>
      </div>
      <div className="row">
        {posts.map((post, index) => {
          return (
            <div key={index} className="col-xs-12 col-sm-12 col-md-12 col-lg-4">
              <BlogItem post={post} />
            </div>
          );
        })}
      </div>
    </div>
  );
}
BlogItem.js
export default function BlogItem({ post }) {
  const redirectToHashnode = () => {
    window.open("https://blog.christianpelayo.com/" + post.slug, "_blank");
  };

  const getDateAdded = () => {
    let d = new Date(post.dateAdded);
    let ye = new Intl.DateTimeFormat("en", { year: "numeric" }).format(d);
    let mo = new Intl.DateTimeFormat("en", { month: "short" }).format(d);
    let da = new Intl.DateTimeFormat("en", { day: "2-digit" }).format(d);
    return `${mo} ${da}, ${ye}`;
  };

  const formattedDate = getDateAdded();

  return (
    <div className="card mb-3 border-light" onClick={redirectToHashnode}>
      <style jsx>{`
        .card {
          cursor: pointer;
        }
      `}</style>
      <img src={post.coverImage} className="img-fluid" />
      <div className="card-body">
        <h3 className="card-title">{post.title}</h3>
        <h6 className="card-subtitle mb-2 text-muted">{formattedDate}</h6>
        <p className="card-text">{post.brief}</p>
      </div>
    </div>
  );
}
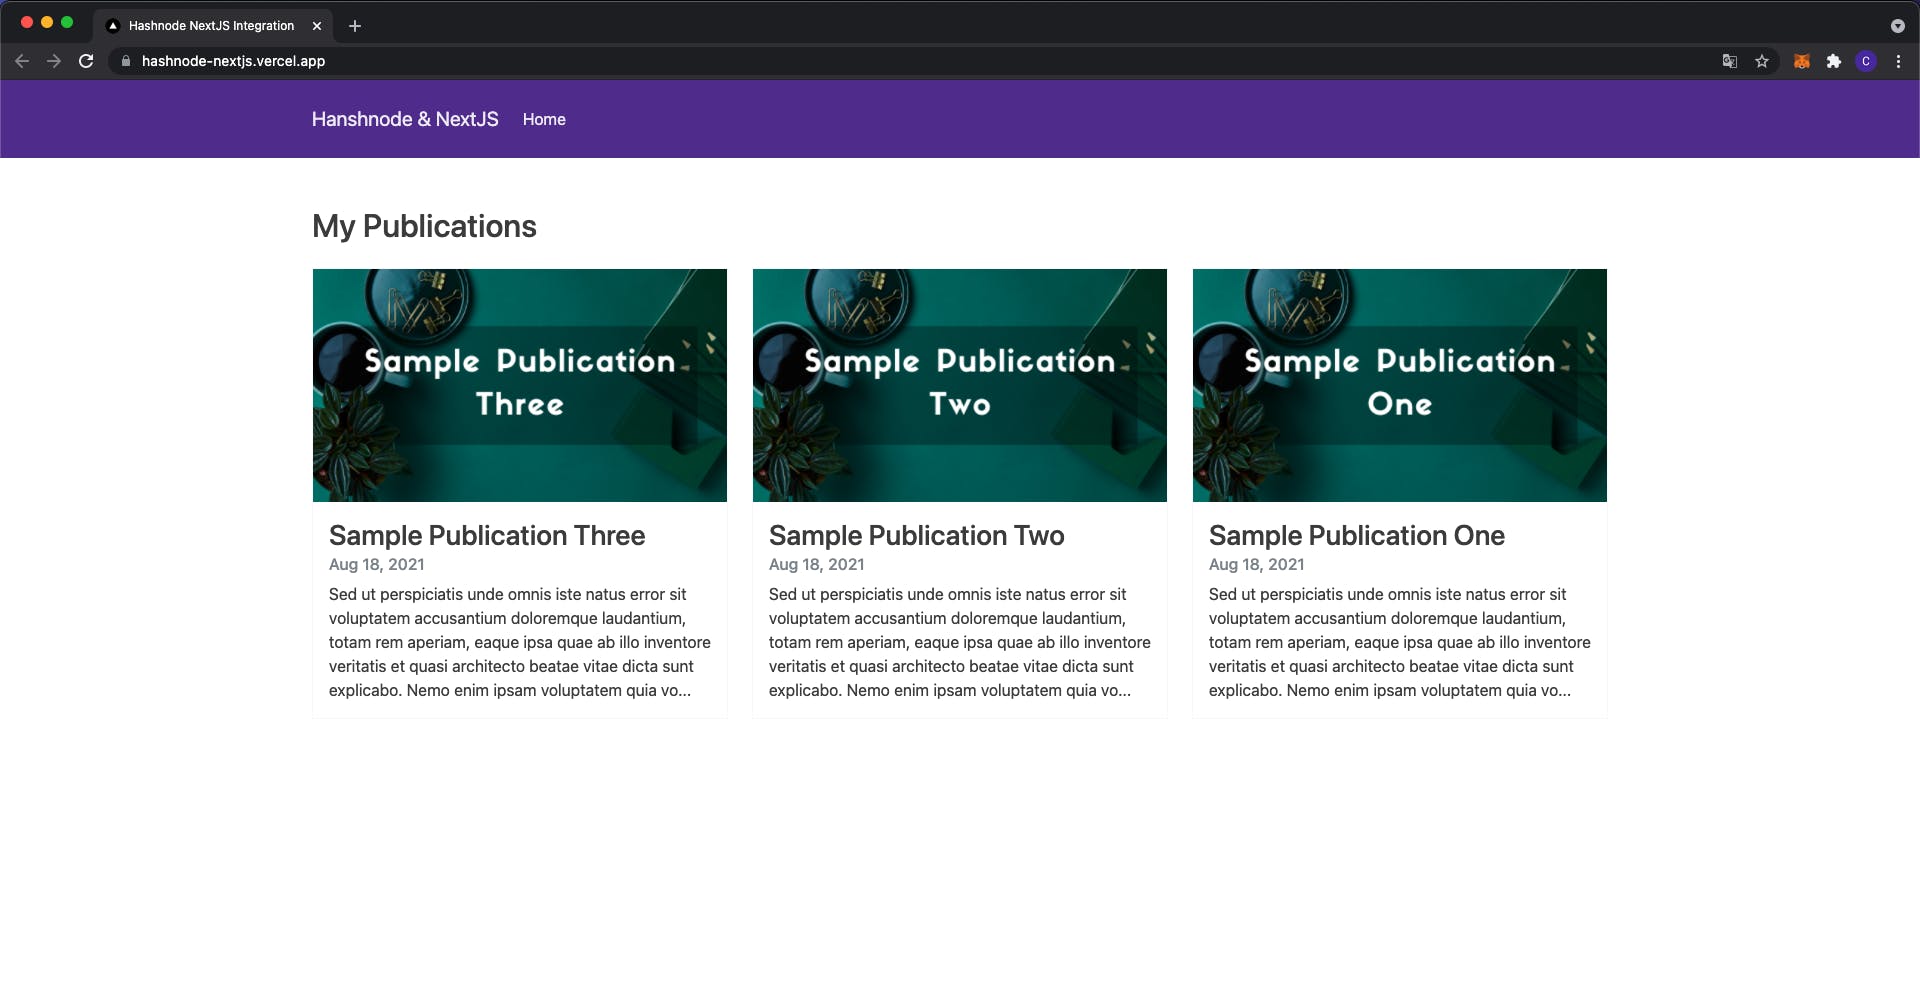
Final result 🙌 👏
Conclusion
Awesome! ! ! you already know how to integrate Hashnode in your NextJs project. Hope it helps. 😉
Thank you! Happy hacking ... 💻